Icing for Writing Recipe Easy Small Batch

Tessa's Recipe Rundown...
Taste: Sweet without tasting cloying or artificial.
Texture: Once the icing is completely set it hardens enough to not smudge, but not too much that it ruins the texture of the cookie.
Ease: Well, easy 😉
Appearance: So pretty and your decorating options are really limitless.
Pros: Easy and fun way to decorate any cut-out cookie.
Cons: None.
Would I make this again? Absolutely!

Since I love to bake and have made a career out of it, many people also assume that means I love to decorate. I actually learned a fair amount about cake, cookie, and pastry decorating in culinary school but I have a big secret…
I actually hate decorating. Hate might be too strong a word but seriously, I usually find it extremely tedious, boring, and pointless. It's just going to get eaten and there's nothing worse than people NOT eating something because it's too pretty!! I guess I'm practical in that way.
NOTE: If you need an equally EASY sugar cookie recipe, just click here to see mine!
Lately, however, some of my favorite bloggers and Instagrammers have convinced me that sometimes making something beautiful is worth the extra time and effort. That doesn't mean I'm not going to try to find a way to make it easier, though.
And that's how I came to this method for Easy Cookie Icing. Royal icing may be beautiful, but it's a huge pain and doesn't even particularly taste good. Blah.
This easy cookie icing takes the same basic approach as royal icing. You make a thick border icing and then a thinner flood batch to completely decorate the surface of your cookies.

How to Make The EASIEST Sugar Cookie Icing
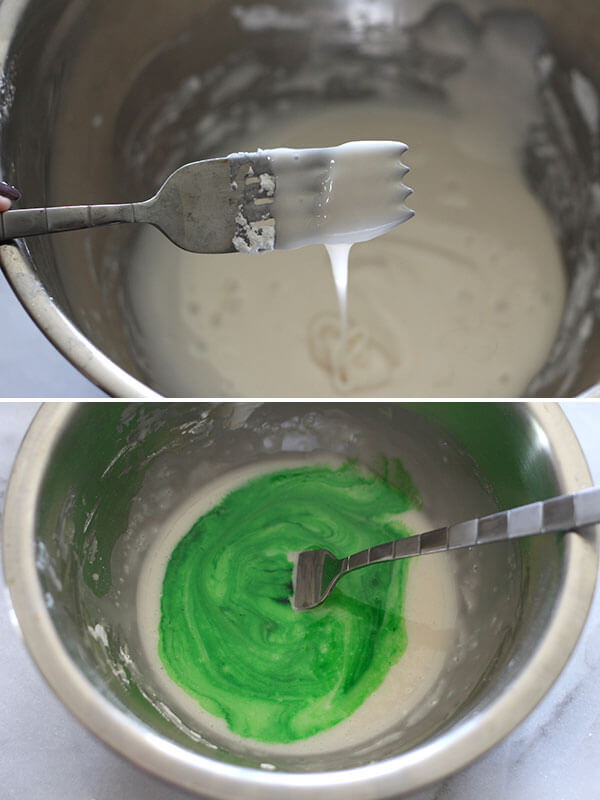
How to get the perfect consistency for cookie icing?
This comes down to one thing: the powdered sugar.
Firstly, be sure to use finely ground powdered sugar. Some brands at 5x ground and some are 10x. You want the latter to avoid any grittiness. You'll also want to sift the sugar first to make it completely smooth both in terms of texture and appearance.
Secondly, it's really key to adjust the sugar and liquid to the right consistency for YOUR kitchen. Different brands of powdered sugar, different methods of measuring (cups vs. scale), water vs. milk, humidity, etc. will all affect how thin or thick your icing will turn out. Just keep adjusting the ratio until it's right for you.
How to get perfect cookie icing designs
You can always practice icing on a piece of parchment paper to test the consistency and to practice your decorating. You can even scrape the designs back into your bowl to avoid wasting!
What kind of food coloring to use for decorating cookies?
I 100% prefer to use gel food coloring for icing cookies. Either Americolor or Wilton gel food coloring) are my go-tos. Gel coloring packs a powerful punch without adding extra liquid to the mixture. Start with just a drop of two and work from there.
What do you use to pipe cookie icing?
Either squeeze bottles or pastry bags fitted with small plain tips. That's all you really need! I personally prefer squeeze bottles as I find they're easier to hold and handle and you could even get the kids involved with those!
Do you need corn syrup to make cookie icing?
Nope, not for this recipe! If you wanted to add some to get that shine and more viscous consistency, start with a teaspoon.
Can cookie icing be made ahead of time?
Yes! It can be made a day ahead of time and stored in a squeeze bottle or resealable container. Remix or pop in the microwave very briefly until it's workable again.
How long does it take for cookie icing to harden?
You kind of want to think of this icing like paint "curing." It needs a full 24 hours sitting out untouched before it'll be completely harden enough to stack or transport without smearing anything.
You can find even more Christmas baking recipes here at my Christmas Headquarters!
For the border icing::
- 1 cup (4.4 ounces) powdered sugar or more, sifted
- 1/2 teaspoon vanilla extract
- 2 tablespoons water or milk
- Gel food coloring, if desired
For the flood icing::
- 1 cup (4.4 ounces) powdered sugar, or more, sifted
- 1/2 teaspoon vanilla extract
- 3 tablespoons water or milk
- Gel food coloring, if desired
For the border icing:
-
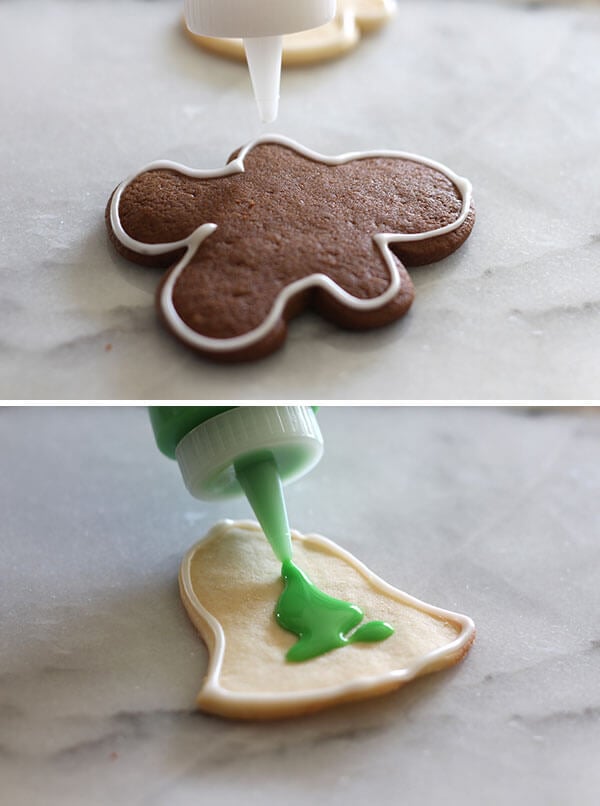
In a small bowl, use a fork to beat together all the ingredients except the food coloring. Beat in the food coloring, a few drops at a time, until colored to your liking. The mixture should be very thick but still pourable. Add more powdered sugar as needed.
-
Transfer the border icing to a squeeze bottle using a funnel. You can also scoop into a pastry bag fitted with a small plain tip. Before you begin icing any cookies, take a few moments to practice on a piece of parchment paper to get the feel of the icing.
-
Holding the bottle or bag tip directly over one corner of a cookie, begin tracing an outline of the cookie, squeezing gently and using both hands if needed to maintain consistent pressure. I prefer to allow a little slack in my icing line as I go. If you mess up, simply wipe the icing off and start again. Allow the icing to dry slightly before continuing with the flood icing.
For the flood icing:
-
In a small bowl, use a fork to beat together all the ingredients except the food coloring. Beat in the food coloring, a few drops at a time, until colored to your liking. The mixture should still be pretty thick, but will drizzle more freely than the border icing. If needed, add additional water or milk to loosen until the consistency is pourable. Or, add more powdered sugar as needed to thicken. Pour the flood icing into a squeeze bottle or into a pastry bag fitted with a small plain tip.
-
Prepare as many batches and colors of flood icing as you need to decorate your cookies.
-
Begin filling the interior of the border drawn on each cookie with the flood icing, being careful not to add too much that it overflows the border icing. Use either the nose of the bottle or a small toothpick to push the icing evenly over the cookie and up against the corners.
-
Leave the iced cookie to dry for 24 hours. The cookies are dry when the surface is completely smooth, dry, and resists smudging when touched. Store the dried cookies between sheets of parchment paper in an airtight container at room temperature for up to 10 days.
The amount of powdered sugar needed for the icing will depend on whether you use milk or water, the sugar brand used, and the humidity of your kitchen. Adjust until you get the desired consistency. For best results, use organic powdered sugar which is made with tapioca starch for a thicker sturdier consistency and better flavor. The iced cookies will need to dry for 24 hours before they can be safely moved or packaged.

![]()
About Tessa...
I share trusted baking recipes your friends will LOVE alongside insights into the science of sweets. I'm a professionally trained chef, cookbook author, and cookie queen. I love to write about all things sweet, carb-y, and homemade. I live in Phoenix, Arizona (hence the blog name!)
Find Tessa on
© Handle the Heat - handletheheat.com
Source: https://handletheheat.com/easy-cookie-icing/
0 Response to "Icing for Writing Recipe Easy Small Batch"
Post a Comment